Friday 27 July 2012

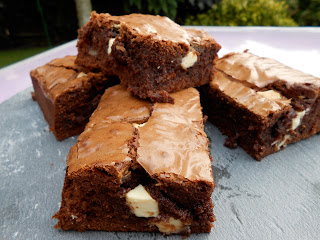
Best Ever Gooey Chocolate Brownies

I know, I know. Brownies are not a tart but from time to time I'll stretch the boundaries a bit and feature tart-like recipes.
I have a confession. I don't like chocolate. Weird I know but I'm convinced I was hypnotised when I watched Paul McKenna on This Morning cure a woman of her chocolate addiction by getting her visualise a bar of chocolate with worms, straw and all sorts of other nasties wiggling around in it. Well, it worked for me. Ever since then I really haven't fancied chocolate at all. White chocolate however is a different matter, he didn't get me on that one luckily.
Anyway, I'm always being asked for a good brownie recipe and this, according to my trusty tasters, is one of the best and it's it's really easy too. I've added chunks of white chocolate to this batch but you could leave it plain or replace it with pecan nuts, chunks of Oreo cookies or chopped fudge. Serve warm with a scoop of ice cream for an indulgent pud or cold as a cake. It also freezes well as a slab or cut into pieces.


Makes 16 good-sized brownies
Takes about 50 mins

250g butter
400g dark chocolate, broken into squares
5 eggs
350g light brown muscovado sugar
1 tsp vanilla extract
250g plain flour
200g white chocolate, chopped

1 Heat the oven to 180C, Fan 160C, gas 4. Grease a 23cm x 30cm baking tin and line the base and sides with baking parchment. Melt the butter and dark chocolate in a pan over a low heat, stirring occasionally until melted and smooth. Leave to cool slightly.

2 Using an electric mixer, whisk the eggs, sugar and vanilla extract together until light and fluffy, this will take about 5 mins. Stir in the melted chocolate mixture and fold in the flour until evenly mixed. Stir in about two-thirds of the white chocolate and tip the mixture into the prepared tin. Spread level and scatter remaining white chocolate over the top.

3 Bake for 25-30 mins until shiny, slightly cracked on the top and just firm to the touch. Cool slightly then cut into 16 pieces.

Sunday 22 July 2012

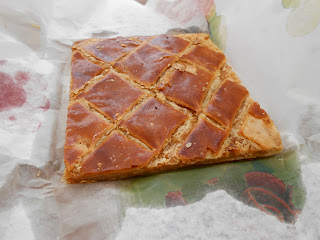
Galette de pommes de terre

When we're in France I always get seduced by all the wonderful patisserie and breads. I'm like a child in sweet shop and always come out of the boulangerie clutching a little paper wrapped parcel. On this occasion I was in a boulangerie in a town called Argenton-sur-Creuse in central France. Delicious bread was being baked in the wood fired bread oven at the back of the shop, so as well as buying my bread for the day I was tempted by a square of this golden, glossy-glazed, flaky pastry potato tart.


Sadly the flavour was very disappointing and bland. The only way I can describe it was very smooth unseasoned potato puree between two sheets of pastry. I like the idea though so here's my version of Galette de pommes de terre (potato tart) with added creme fraiche, garlic and chives. It's delicious served warm with a tomato salad dressed with a zingy Dijon mustard dressing. Or, serve it cold for picnics - it holds together quite well so you can easily eat it with your fingers.


Serves 6
350g medium-size new potatoes, thinly sliced (or you can use leftover cooked potatoes)
150ml creme fraiche
1 juicy fat garlic clove, crushed
3 tbsp snipped chives (I use scissors for this)
Salt and freshly ground pepper
2 (320g) sheets ready-rolled puff pastry
1 egg, beaten

1 Preheat the oven to 200C, Fan 180C, gas 6. Line a baking sheet with baking parchment. Cook the potato slices in a pan of boiling water for 5-7 mins until just tender. Drain and rinse under cold water then drain again.

2 Place the creme fraiche in a small bowl, stir in the garlic and chives and season with salt and freshly ground pepper.

3 Unroll one of the sheets of pastry and place on the baking parchment lined baking sheet. If the potatoes are quite wet dab them with kitchen paper then arrange them, overlapping slightly, over the pastry leaving a 1cm border all around the edge. Spoon the creme fraiche mixture over the potatoes to thinly cover.

4 Brush the 1cm border with beaten egg and place the other sheet of pastry over the top. Press the edges together to seal then flute the edges using your fingers or press with the back of a fork. Brush the pastry all over with beaten egg and, using a sharp knife, score criss cross lines across the top. Bake in the oven for 15-20 mins until the pastry is golden brown and risen slightly. Cut into squares to serve.


Sunday 15 July 2012

Tenderstem & Cambozola Tartlets

I'm a firm believer in simple things often being the best, especially when it comes to food and using good quality ingredients. This tart is a case in point - just 3 ingredients and only 15 mins from start to finish. I'll admit it's not my own creation, it's from the lovely Tenderstem broccoli people who've got lots of great recipes on their website - take a look at www.tenderstem.co.uk. I served this tart as a pre Race for Life light meal for my sister and I, and it certainly kept us going through the rain!


Serves 4
200g Tenderstem broccoli
1 packet ready-rolled puff pastry
200g Cambozola cheese

1 Preheat the oven to 220C, Fan 200C, gas 7. Lightly cook the Tenderstem for 1 minute in boiling water, drain.

2 Unroll the sheet of pastry, cut it into 4 rectangles and place them on 2 baking strays lined with baking parchment.

3 Arrange the Tenderstem, floret-to-stem, along the pastry and top with thin slices of Cambozola, taking care to cover the delicate tips with cheese to prevent them scorching.

4 Season with a grind of black pepper and a little salt and bake for 8-10 minutes until the pastry is golden. Serve with a punchy rocket salad.

For a Tenderstem, Caramelised Onion and Brie Tart (my variation):
Keep the pastry sheet whole and make 1 large tart, spread it with 2-3 tbsp caramelised onion chutney, top with the Tenderstem, 100g cubed brie and 50g grated Cheddar and bake as above.


Monday 9 July 2012

Little Strawberry Jam and Vanilla Cream Tarts

We've had plenty of strawberries from the allotment this summer but there's been more than a few ugly Bettys amongst them. They taste great but just lack a little in the looks department, hence they get left at the bottom of the bowl. So I set to and made some jam, a good way to preserve and enjoy less than perfect fruit. The recipe in this post is more about the jam than the tarts as I bought some sweet little all butter tartlet cases from M&S ( £2.29 for 18), but you could make them yourself. This jam is quite soft set because it's only boiled for 4 minutes, this helps retain a fresh strawberry flavour and bright colour. Don't forget to use jam sugar (not to be confused with preserving sugar), it has added pectin (the setting agent) which strawberries and other soft fruit lack.
But, even if you use bought good quality jam or conserve and readymade tartlet cases you've still got delicious bite-size tarts you can put together in the time it takes to whip some cream.


Strawberry Jam
Makes 4-5 jars depending on the size
1kg strawberries, hulled
4 tbsp lemon juice (about 1 lemon freshly squeezed)
1kg jam sugar


1 Wash and dry the jars, place on a baking tray and heat in a warm oven for about 10 mins. At the same time place a saucer or small plate in the freezer to chill. Place the strawberries in a large pan (use the biggest pan you have as the jam will bubble up when you boil it) and mash roughly with a potato masher to break them up. Add the lemon juice and bring to the boil, stirring occasionally.


2 Reduce the heat, add the sugar and stir until dissolved. Increase the heat, stirring occasionally until the mixture comes to a rolling boil. Boil for 4 mins then remove from the heat. To test if the jam is ready, place 1/2 tsp jam onto the saucer from the freezer. Leave to cool for about 1 minute then push the jam with your finger. If it has set and wrinkles it's ready. If it's still very runny, bring the jam back to the boil and boil for a further 2 minutes and test again. Stir in a knob of butter and skim off any surface foam (this is still tasty to eat so keep to one side). Pour the jam into the warm jars, cover and label.


To make the tarts
1 pack 18 mini all butter tartlet cases
3 tbsp strawberry jam
150ml pot whipping cream
1/2 tsp vanilla paste or vanilla extract
A few fresh strawberries, to decorate
Icing sugar, to dust

1 Arrange the tartlet cases on a plate or cake stand and spoon 1/2 tsp jam into each one.

2 Whip the cream with the vanilla paste or extract until just thick enough to form soft peaks. Spoon a teaspoon of whipped cream onto each tart and decorate with a piece of fresh strawberry. Dust with icing sugar and serve within 1 hour of assembling.


Monday 2 July 2012

Broad Bean, Bacon and Red Pesto Tart


Ok, so here's a lovely light summery dish to kick off my blog, inspired by broad beans picked from our allotment.  Broad beans are a veg I've only really 'discovered' in the last few years since growing them. They signify the start of summer to me as we grow them over winter and they're the first of our veg ready for picking.  We share our allotment with another couple and it's become a sunday morning ritual to meet at the allotment, put the kettle on for a coffee, sit in our deck chairs and mull over the week before getting down to work.
If you haven't got broad beans (frozen ones are fine) you can use peas in this recipe instead. I've made a buttery shortcrust but if you don't have time use a 375g pack of readymade shortcrust.


Makes 1 28cm diameter tart, enough to serve 6
For the pastry:
200g plain flour
100g butter
2 tbsp cold water
For the filling:
100g unsmoked or smoked bacon, chopped
6 spring onions (about 1/2 a bunch) trimmed and chopped
200g broad beans (podded weight)
250g tub ricotta cheese
4 medium eggs
100ml milk
Salt and freshly ground pepper
4 tbsp freshly grated Parmesan cheese
4 heaped tsp red pesto

1 To make the pastry, place the flour in a bowl and rub in the butter using your fingertips until the mixture resembles fine breadcrumbs (you can do this in a food processor if you like). Add the water and stir in using a round bladed knife, then using your hand bring the mixture together to form a ball (again if using a food processor add the water and pulse until the dough just comes together). Lightly knead the pastry to make a smooth dough.

2 Roll out the pastry to a round about 2cm larger than the tin all round. Lift the pastry into the tin and ease it into the sides and base. Roll the rolling pin across the top of the tin to trim off the excess. This quantity of pastry is just enough for this size of tin and it is quite short so don't worry if there are a few splits and cracks, just patch it up with the trimmings. Place the lined tin on a baking tray and chill for 30 mins.

3 While the pastry is chilling, make the filling. Fry the bacon in a dry frying pan for a few minutes until starting to brown. Add the spring onions and cook for another 2-3 mins. At the same time, cook the broad beans in a pan of boiling water for about 3 mins. Drain, rinse under cold water until cool enough to handle and then pop them out of the grey skins (you don't have to do this but I prefer to for a better colour and flavour).

4 Place the ricotta in bowl with the eggs and beat together with a hand whisk until smooth. Whisk in the milk, season with salt and freshly ground pepper and stir in the Parmesan.

5 Preheat the oven to 200C, Fan 180C, gas 6. Line the chilled pastry case with a sheet of baking parchment and weight down with baking beans or dry rice. Bake in the oven for 10 mins then remove the paper and beans or rice and bake for a further 10 mins. This is called baking blind and helps to keep the pastry crisp.

6 Spread the pesto over the base of the pastry case and scatter the bacon, spring onions and broad beans over the top. Pour the ricotta and eggs mixture evenly over the filling and bake for about 25 mins until the filling is set and golden. Serve warm or cold. We enjoyed ours fresh from the oven with some new potatoes and a leafy salad.